Hey Fyre, guess who found out how to rip .scenario files out of the DoW2 .sga archive files and start goofing with the official maps in the World Builder? ‘Sme!
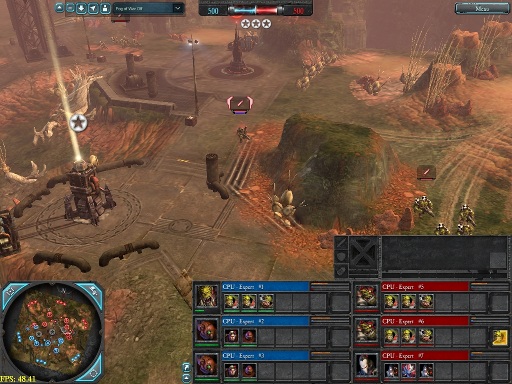
Here we see a screenie of good old Calderis Refinery with the textures swapped out for the Typhon jungle set. It still looks a bit desert-y because all of the desert objects, splines and splats are still there, but we’ll get to that soon enough.
I’ll be adding to this post later with details on where I found the info, what tools I used, the steps to take, and where we’re going from here. But for now, sister, know that our vengeance on this map is near at hand.
UPDATE: Aaaand a whole lotta info added. The doorway to madness lies beyond this jump:
We’ve been saying for a while now that 6P Calderis Refinery is an ass-credible map that needs serious work, and as the sort of fellow who’s always taken apart his toys to see how they go, I’ve developed an interest in attempting to re-jigger this thing into something I can play happily. I don’t really have the motivation (or skills) to recreate the refinery from scratch, but I’ve found a way to pull the actual PVP map out of the game files and open it up in the World Editor that shipped with TIOW. We’ll get into the changes that I want to implement at a later date, but for now let’s talk about how I (and you) can start chopping into Relic’s lovely, detailed PVP maps for our own nefarious purposes.
I started, as I start all things, with Google. Searching for “sga extractor dawn of war 2” led me to this thread on GerstmannSpot, which in turn sicced me on this very handy little collection of modding tools. I know that the forum post implied that you need more, but I promise you on the grave of my dignity that you only need to download and extract SGA Reader 2; grab the February 15th version, just so you have the latest and greatest.
Having laid out my toolkit, I got to slicing on my DoW2 installation. You can backup your game files if you like; I roll recklessly at times, as Fyre will tell you, and I was eager to get working on redeeming myself after a fairly spectacular World Builder-related meltdown at PAX. YMMV.
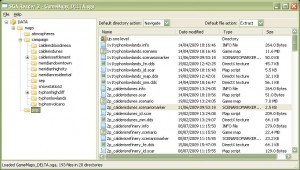
Fire up SgaReader2.exe, choose Open from the File menu, and navigate to C:\Program Files\Steam\SteamApps\common\dawn of war 2\GameAssets\Archives\GameMaps_DELTA.sga. Expand the “maps” folder, choose pvp, and voila! A smorgasbord of map data for all the multiplayer maps we know so well unfolds in the panel on the right side of the program window.

Find the map that you want to muck with and get extracting. Notice that some maps have different names than they ended up showing in the final project; for instance, 6P Capital Spire is called “6p_meridianhighcity”. A little bit of detective work and careful thinking will get you the map you want. It’s like a Tex Murphy game! Find all the files for the map you want and double click each one; sadly, you can’t shift-select more than one at a time. When you double click the first file, a little window will pop up with the file name and a destination path. Select Browse and browse to the location for user-edited maps: C:\Program Files\Steam\SteamApps\common\dawn of war 2\Assets\Maps\PVP. Save all the files for the map you want to this location.
Now open up that destination folder in windows and find the *.scenario file you saved. The DoW2 world builder won’t open .scenario files, but if you edit the extension to read .wb-scenario you’ll be good to go. At this point you can fire up the World Builder and open up that .wb-scenario file, although it may take a moment to load up and appear on screen.
We’ll get into some of the fun things you can do in the World Builder another time, but for starters why not give the map you’ve opened a quick re-skin and see how it looks when set on another planet? Look for a button in the toolbar that says “TILE”; when you hover the mouse over it, it’ll say “Texture Tile Painting Editor”. Click this and the panel on the right side of your screen populates with all the controls you need to paint textures on the ground. There are four parts to this panel, and it probably doesn’t fit on your screen but you can drag your way up and down the panel with the mouse, or just use the scroll wheel on your mouse to scroll the panel up and down.
To start with, click on the title box for the “Edit Modes” section of the panel to collapse it and give yourself some room; we don’t need it right now. Do the same thing on “Preview” down at the bottom of the panel. Also, look around the toolbar at the top of the screen for a button with an eye and the word “FOG”. Click it to turn the map fog off; fog is nice when you want to preview atmospheric effects and the like, but right now we want to be able to see the whole map when we’re zoomed out, and fog is going to get in the way.
Speaking of which, click in the main window to make it active and use your mousewheel to zoom out until you can see a lot of the terrain. Now look back at the terrain panels on the right side of the screen. See how the Layers section has a list of textures? Click on one to highlight it. Now click on a texture from the list in the “Existing Layers” section, and click the “Assign Layer” button at the top of the “Existing Layers” section. Ta-da, the new texture replaces the old texture everywhere it appears on the map. Try replacing all the textures in a jungle map with desert textures and see what a difference it makes.
As I’ve noted above, this doesn’t replace stuff like splats, splines, and objects, just the color of the base terrain below them. You can make all of those things invisible if you’d like to admire your handiwork; just click the “eyeball OBJ” (objects), “eyeball SPL” (splats) and “eyeball road” (splines) buttons in the toolbar to toggle the display of the appropriate elements. Come to think of it, I probably ought to just work up an Ordo article that runs you through the UI, or at leat the main bits for PVP mapmaking. Look for that next time. Til then.
Ante Carto, Nullum Mundus
-ssr
Let the purgation by map editor begin!!!